Se afișează postările cu eticheta design. Afișați toate postările
miercuri, 23 octombrie 2013
Mickey Mouse Inspired Nail Art
Hello!! I did a Mickey inspired design today. It's my first atempt at drawing a face,so don't laugh to hard. This is the design:
I hope you like this nail design.
Kisses, Danussa!
Etichete:
avon,
baby pink,
base coat,
black,
bows,
color,
cuticles,
design,
design.,
designs,
dots,
inspired,
mickey mouse nail art design,
nails,
nails by,
polka dots
duminică, 20 octombrie 2013
Cute Piggies
Hello! It has been a very long time since I've posted a nail design. But now I'm back!! Today I have a cute design with some pink pigs, what can be cuter that this??
This is what I used:
I hope you like this post and comment about it.
Kisses, Danussa!!!
sâmbătă, 8 mai 2010
Pink and Bubbles
This is a design I wore last week, but I didn't post it. Hope you like it, it's funny!
As always, apply base coat and 1-2 coats of your favorite pink shade.
Take a thin brush (like an old eyeliner brush) and a sparkly nail polish and draw the corner of the nail.
With a pen , make white dots on the empty part of the nail.
Then, with a toothpick take that same pink color that you have used as a base color and dot the middle of the white dots, so that it looks like bubbles.
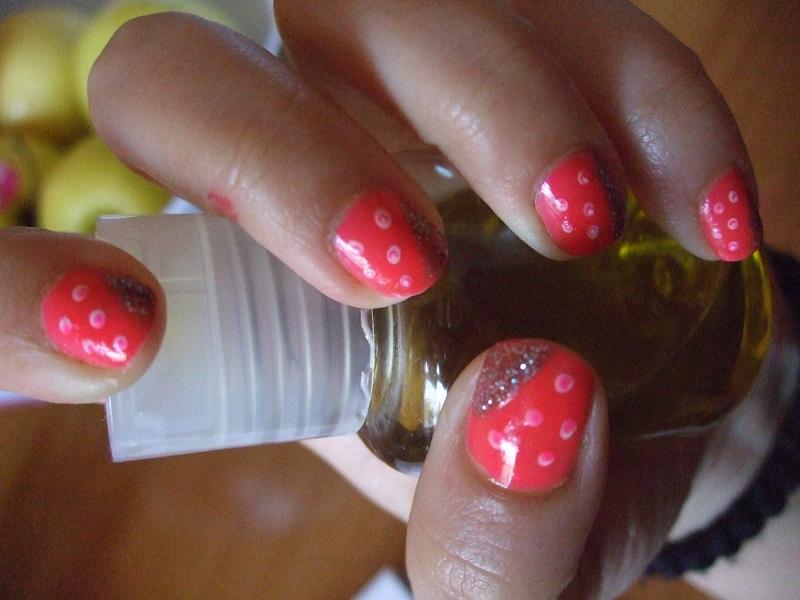
Apply top coat and there you have it!
luni, 12 aprilie 2010
Gradient blue and flower
Hello! Tomorrow I'm going to wear a blue outfit so i did a blue inspiration nails. After the base coat, I've started to do a gradient effect(I already have another gradient post here). Start with a pale blue and a sponge and apply it from the tip of the nail going downwards but stop before you touch the cuticle.


Do the same thing with a dark blue and stop in the middle of the nail.

You could leave it like this, but I though it's a bit boring so I did a little flower on the ring finger. I took a thin brush and a white nail polish and started to drew a flower and some dots around it. If you want to, you can underline it with pink like I did, I just think it's much more cute this way. I also placed a tiny dot of sparkle in the middle of the flower.


And here's what you'll need for this design. If you try it out, show me!


Do the same thing with a dark blue and stop in the middle of the nail.

You could leave it like this, but I though it's a bit boring so I did a little flower on the ring finger. I took a thin brush and a white nail polish and started to drew a flower and some dots around it. If you want to, you can underline it with pink like I did, I just think it's much more cute this way. I also placed a tiny dot of sparkle in the middle of the flower.


And here's what you'll need for this design. If you try it out, show me!
sâmbătă, 10 aprilie 2010
Black and white toe design!!!
Hi! Summer is coming up and we don't have to hide our toes anymore! So here's a cute design.
First apply base coat and 1-2 coats of a favorite color, it doesn't matter . Paint half of the toenail white and the other half black.

With a toothpick quickly play with the two color, combine them in the middle of the nail. Seal with top coat and your toenails now look awsome!!!
First apply base coat and 1-2 coats of a favorite color, it doesn't matter . Paint half of the toenail white and the other half black.
With a toothpick quickly play with the two color, combine them in the middle of the nail. Seal with top coat and your toenails now look awsome!!!
Request:Simple design
joi, 8 aprilie 2010
request: red and white flowers
Hello, babes! My cousin Flory came to visit me and of course she wanted a nail design, something simple , not too many colors, so this is it. You will need:

First, apply base coat. Taking a red polish and a pen, make 5 dots on the top of the nail.

Then quickly make a white dot on the center.

Now the magic begins:take a thin brush and start dragging from the white dot trough the red dots and then drag from between the red dots towards the center. I'm sorry I can't show you this, I can only explain.

If you want to, you can add some sprkles in the middle of the flower so the center wouldn't look so bare. I chose some orange sparkles. Enjoy!

First, apply base coat. Taking a red polish and a pen, make 5 dots on the top of the nail.

Then quickly make a white dot on the center.

Now the magic begins:take a thin brush and start dragging from the white dot trough the red dots and then drag from between the red dots towards the center. I'm sorry I can't show you this, I can only explain.

If you want to, you can add some sprkles in the middle of the flower so the center wouldn't look so bare. I chose some orange sparkles. Enjoy!
Abonați-vă la:
Postări (Atom)


